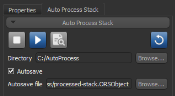
Auto Processing Image Stacks
The Auto Process Stack feature for Dragonfly enables real-time processing of serial section 2D stack experiments. Instead of having to wait for an entire image stack to be available, you can set required operations — such as filtering, registration, classification, or any operation saved in a macro — to be applied automatically to new images as they arrive and interactively monitor the results as the 3D image channel grows.
Choose Tools > Auto Process Stack to open the Auto Process Stack panel, shown below
Auto Process Stack panel

The following options and settings are available in the Auto Process Stack panel.
|
|
Icon |
Description |
|---|---|---|
|
Stop processing |
|
Click to stop auto processing. Auto processing should be stopped only when the current stack experiment is completed. |
|
Start processing |
|
Click to start processing images sent to an image stream folder in the polled directory. |
|
Pause processing |
|
Click to pause auto processing. |
|
Check for file |
|
Click to check for new images in polled directory. If new images are found, they will be processed. |
|
Reprocess stack |
|
Click to re-process all images of the current experiment. |
|
Directory |
- - |
Lets you select the directory that will be polled, for example |
|
Autosave |
- - |
If selected, the current stack will be saved automatically in the ORSObject file format (*.ORSObject extension) each time that a new processed image is added to the current stack. Autosave file… Lets you choose a location and file name for the autosave file. |
|
Check every xx minutes |
- - |
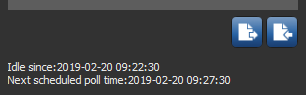
Determines the frequency, in minutes, at which the selected directory will be polled. You should note that the next scheduled poll time is indicated at the bottom of the panel, as shown below.
|
|
Ignore first xx slices |
- - |
If checked, the selected number of image slices that will not be processed, starting with the first image slice added to the polled directory. |
|
Auto center |
- - |
If checked, the 2D and 3D views of the image stack will be re-centered automatically each time that a new image is added so that the larger data volume is in the center of the field-of-view. |
|
Create image mask |
- - |
If checked, a region of interest equal to the dimensions of the processed image stack will be created automatically and updated each time that a processed image is added to the stack. In the resulting mask ROI, all of the identified greyscale image pixels will be labeled, while all of the border black pixels will be left unlabeled. |
|
Fit clip box |
- - |
If checked, the clip box applied to the image stack will be updated with every iteration. |
|
2D LUT |
- - |
Lets you choose the LUT that will be applied automatically to the generated image stack, if it is shown in the 2D views of a scene (see 2D Settings). |
|
3D LUT |
- - |
Lets you choose the LUT that will be applied automatically to the generated image stack. if it is shown in a 3D view of a scene (see 3D Settings). |
|
Add classifier operation |
|
Click to add a trained classifier to the current processing operation. In this case, additional outputs will include the regions of interest processed by the selected segmentation model (see Training Classifiers for Segmentation). Your trained classifiers will be available in the drop-down menu after the operation is added, as shown below.
|
|
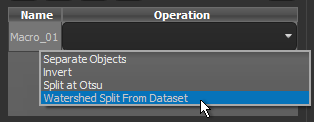
Add macro operation |
|
Click to add a saved macro to the current processing operation (see Recording and Playing Macros). Your saved macros will be available in the drop-down menu after the operation is added. |
|
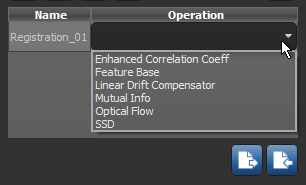
Add registration operation |
|
Lets you automatically register images that are added to the current stack (see Slice Registration Methods and Settings). All available slice registration methods will be available in the drop-down model after the operation is added, as shown below.
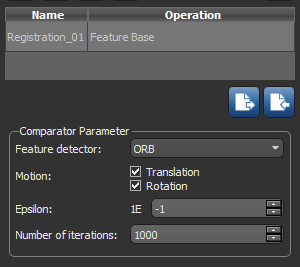
Note The Linear Drift Compensator method can only be applied after an image has been registered. Settings for the selected registration method are available in the Comparator Parameter box, as shown below.
Note In most cases, you should apply image filtering before an alignment operation. |
|
Add filter operation |
|
Click to add a saved image filtering task to the current processing operation (see Saving and Loading Image Filtering Operations). All of your saved image filtering operations will be available in the drop-down menu after the operation is added. |
|
Delete selected operation |
|
Lets you delete the selected operation. |
|
Export operation stack |
|
Lets you export the current operation stack in the JSON file format (*.json extension). See Saving and Importing Operations. |
|
Import operation stack |
|
Lets you import a saved operation stack (see Saving and Importing Operations). |


A number of settings and options, which include the time interval for checking for new images and the operations that will be applied during processing, need to be configured before you begin auto processing. The designated directory that will polled for new images also needs to be selected.
- Choose Tools > Auto Process Stack on the menu bar.
The Auto Process Stack panel appears on the right sidebar.

- Click the Browse button and then choose a directory in the Select Target Directory dialog.
This is directory that will be polled for new image files.
- Add a folder to receive scan data in the selected target directory, optional.
You can also add this folder when you configure your scanning system to output image slices to the selected directory.
Note The message, "Waiting for image steam," will appear on the Auto Process Stack panel if you start auto processing without first adding a folder to receive scan data.
- Check the Autosave option, if required.
When checked, you can choose a destination and file name for the dataset that will automatically saved and updated during auto processing.
- Configure the additional settings for auto processing, including the polling frequency, number of first slices to ignore, 2D/3D LUTs to be applied, and other options (see Options and Settings).
- Add the required operation(s), as follows:
- Click the icon — Classifier, Macro, Registration, or Filter — that corresponds to the operation you want to add.
The requested operation appears in the Name column in the operation stack.
- Double-click inside the corresponding Operation box and then choose the required segmentation model, macro, slice registration method, or saved filtering operation in the drop-down menu.
Note If you added a registration operation, you will also need to choose the settings for selected method in the Comparator Parameter box (see Slice Registration Methods and Settings).

- Add additional operations to the stack, as required.
If required, you can change the order of applied operations by simply dragging an operation box to a new position in the list. You should also note that in most cases, filtering should be applied before an alignment operation.
Note You can also import a saved operation stack (see Saving and Importing Operations).
- Click the icon — Classifier, Macro, Registration, or Filter — that corresponds to the operation you want to add.
- Save the operation stack, if required.


Whenever you’re ready, simply click the Start button to begin auto processing. As new images become available in the polled directory, Dragonfly will process then accordingly and integrate them into a 3D image channel that can be rendered with a look-up table (LUT).
- Select the required settings for auto processing and add the required operations (see Configuring the Auto Process Stack Feature).
- Configure your scanning system to output scans to the designated folder within the polled directory.
- Start scanning your sample.
- Click the Start Processing
 button on the Auto Process Stack panel.
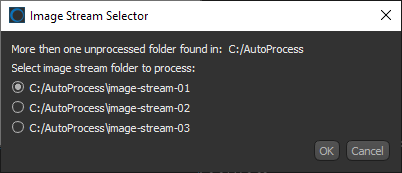
A log file that lists all image files currently processed currently —
.stackjobmetadata— is created in the polled directory.Note If more than one folder containing unprocessed images is found in the polled directory, you will have to selected the image stream folder to process in the Image Stream Selector dialog.

Note You can continue working with Dragonfly during monitoring and auto processing, although auto processing may interrupt a current operation.
- Monitor the results of auto processing, recommended.
If required, you can pause processing and then adjust the added operations.
Note Click the Reprocess Stack
 button to apply the modified operation stack to the current images that have already been processed.
 - Click the Stop Processing
 button when scanning and subsequent processing is complete.
 - Save the processed image stack (see Exporting Objects).
- Archive the original images that were added to the target folder, if required.
If required, you can save and import an auto processing operation stack.
- Configure the required operations, as described in Configuring the Auto Process Stack Feature.
- Click the Export Operation Stack
 button.
 - Choose a file name and location in the Save Operation Stack to File dialog.
- Click the Import Operation Stack
 button.
 - Navigate to and choose the required operation stack in the Load Operation Stack from File dialog.
Note Operation stacks are saved in the JSON file format (*.json extension).
- Click the Open button to load the selected operation stack.
The saved operations appear in the Auto Process Stack panel.